Share Everything to Everyone

Tampilkan postingan dengan label JARINGAN. Tampilkan semua postingan

Selasa, 22 Februari 2022

Evolution of STP

21.38 Posted by ROSYID'S BLOG , , No comments

Up to now, we have used the term Spanning Tree Protocol and the acronym STP, which can be misleading. Many professionals generically use these to refer to the various implementations of spanning tree, such as Rapid Spanning Tree Protocol (RSTP) and Multiple Spanning Tree Protocol (MSTP). In order to communicate spanning tree concepts correctly, it is important to refer to the implementation or standard of spanning tree in context.

The latest standard for spanning tree is contained in IEEE-802-1D-2004, the IEEE standard for Local and metropolitan area networks:Media Access Control (MAC) Bridges. This version of the standard states that switches and bridges that comply with the standard will use Rapid Spanning Tree Protocol (RSTP) instead of the older STP protocol specified in the original 802.1d standard. In this curriculum, when the original Spanning Tree Protocol is the context of a discussion, the phrase “original 802.1D spanning tree” is used to avoid confusion. Because the two protocols share much of the same terminology and methods for the loop-free path, the primary focus will be on the current standard and the Cisco proprietary implementations of STP and RSTP.

Several varieties of spanning tree protocols have emerged since the original IEEE 802.1D specification, as shown in the table.


A network professional, whose duties include switch administration, may be required to decide which type of spanning tree protocol to implement.

Cisco switches running IOS 15.0 or later, run PVST+ by default. This version incorporates many of the specifications of IEEE 802.1D-2004, such as alternate ports in place of the former non-designated ports. Switches must be explicitly configured for rapid spanning tree mode in order to run the rapid spanning tree protocol.


Jumat, 18 Februari 2022

Recovering from a System Crash Cisco

10.46 Posted by ROSYID'S BLOG , No comments

 The boot loader provides access into the switch if the operating system cannot be used because of missing or damaged system files. The boot loader has a command-line that provides access to the files stored in flash memory.

The boot loader can be accessed through a console connection following these steps:

Step 1. Connect a PC by console cable to the switch console port. Configure terminal emulation software to connect to the switch.
Step 2. Unplug the switch power cord.
Step 3. Reconnect the power cord to the switch and, within 15 seconds, press and hold down the Mode button while the System LED is still flashing green.
Step 4. Continue pressing the Mode button until the System LED turns briefly amber and then solid green; then release the Mode button.
Step 5. The boot loader switch: prompt appears in the terminal emulation software on the PC.

Type the help or ? at the boot loader prompt to view a list of available commands.

By default, the switch attempts to automatically boot up by using information in the BOOT environment variable. To view the path of the switch BOOT environment variable type the set command. Then, initialize the flash file system using the flash_init command to view the current files in flash, as shown in the output.

switch: set
BOOT=flash:/c2960-lanbasek9-mz.122-55.SE7/c2960-lanbasek9-mz.122-55.SE7.bin
(output omitted)
switch: flash_init
Initializing Flash...
flashfs[0]: 2 files, 1 directories
flashfs[0]: 0 orphaned files, 0 orphaned directories
flashfs[0]: Total bytes: 32514048
flashfs[0]: Bytes used: 11838464
flashfs[0]: Bytes available: 20675584
flashfs[0]: flashfs fsck took 10 seconds.
...done Initializing Flash.

After flash has finished initializing you can enter the dir flash: command to view the directories and files in flash, as shown in the output.

switch: dir flash: 
Directory of flash:/
    2  -rwx  11834846                 c2960-lanbasek9-mz.150-2.SE8.bin
    3  -rwx  2072                     multiple-fs

Enter the BOOT=flash command to change the BOOT environment variable path the switch uses to load the new IOS in flash. To verify the new BOOT environment variable path, issue the set command again. Finally, to load the new IOS type the boot command without any arguments, as shown in the output.

switch: BOOT=flash:c2960-lanbasek9-mz.150-2.SE8.bin
switch: set
BOOT=flash:c2960-lanbasek9-mz.150-2.SE8.bin
(output omitted)
switch: boot

The boot loader commands support initializing flash, formatting flash, installing a new IOS, changing the BOOT environment variable and recovery of lost or forgotten passwords.


Rabu, 12 Agustus 2015

Konfigurasi Proxy Server with Squid

15.31 Posted by ROSYID'S BLOG No comments
fungsi dari squid adalah  meng-‘cache’ atau menyimpan data yang diminta oleh pengguna (komputer client) biasanya berupa web pages dan FTP. Platform UNIX yang di support oleh Squid adalah FreeBSD, BSDI, Digital Unix, Irix, Linux, Solaris dan SunOs. Tidak semua data bisa di cache oleh Squid, data-data yang bersifat dinamik seperti CGI-BIN tidak di cache oleh Squid, jadi tiap kali ada permintaan CGI-BIN, maka Squid akan menghubungi langsung server tujuan. Saat ini protokol yang bisa dilayani oleh Squid adalah HTTP, FTP, Gopher, dan Wais.
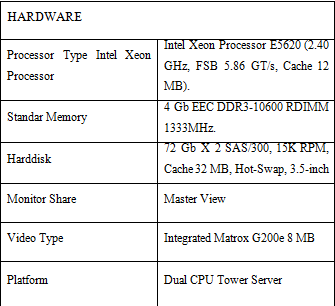
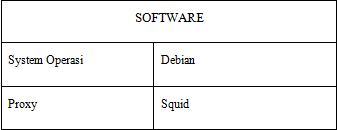
     Berikut ini adalah penjelasan tentang spesifikasi dari Proxy Server . Dimana spesifikasi tersebut terbagi menjadi 2, yaitu : spesifikasi Hardware dan spesifikasi Software.
a. Spesifikasi Hardware
1
b. Spesifikasi Software
2
B. Konfigurasi Squid

Ini merupakan tahap terpenting dari Konfigurasi Proxy Server ini, langkah-langkah dalam konfigurasinya itu banyak . jadi usahakan ikuti semuanya dengan teliti dan seksama yaaa :) , Oke mulai
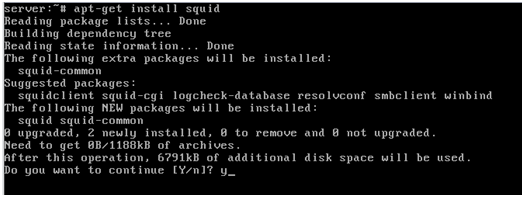
1. Pertama, yaitu dengan menginstall squid dengan cara apt-get install squid
3
2. Setelah itu, hapus file squid.conf untuk memudahkan kita unuk mengatur settingan proxy
4tersebut dengan perintah rm /etc/squid/squid.conf  (agar lebih aman kita backup dulu file tersebut dengan cara cp /etc/squid/squid.conf /etc/squid/squid.conf.backup
5
3. Jika telah berhasil dihapus, selanjutnya adalah dengan membuat file etc/squid/squid.conf kembali yang akan diisi dengan script konfigurasi yang baru dengan perintah nano /etc/squid/squid.conf
6
23
7
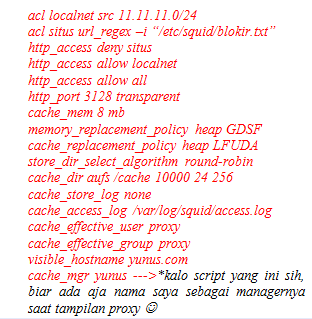
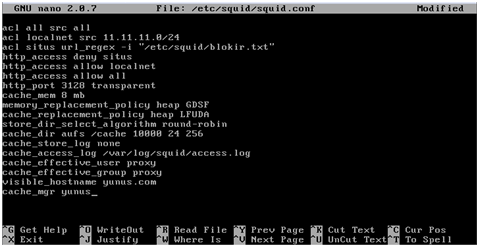
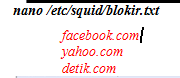
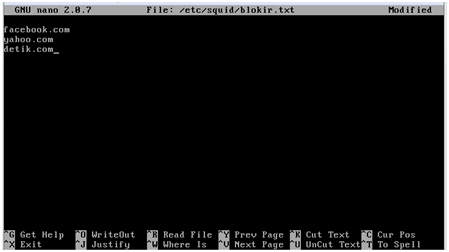
4. Jika selesai, terus di Save. Selanjutnya yaitu membuat file untuk diisi dengan situs-situs atau kata-kata yang ingin kita blok jika orang membukanya, disini saya menggunakan nama file “blokir.txt” dengan perintah
825
9
5. Berikutnya yaitu dengan membuat Direktory sebagai tempat untuk penyimpanan data-data yang kita buka saat melakukan browsing, jadi jika kita pernah membuka situs itu, maka saat kita untuk membuka situs tersebut untuk ke-2 kalinya jadi datanya diambil dari folder cache tersebut. Untuk membuatnya yaitu dengan perintah mkdir /cache
10
6. Setelah itu , untuk mengaktifkan file yang mau kita blokir tadi yaitu dengan perintah chown –R proxy:proxy /etc/squid/blokir.txt
11
7. Selanjutnya untuk menyimpan data di tempat cache, maka kita harus melakukan “permisi” dulu ke folder cache dengan cara chown –R proxy:proxy /cache
12
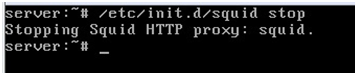
8. Kita stop service squidnya dengan cara /etc/init.d/squid/stop
13
9. Jika telah di stop, maka selanjutnya yaitu kita membuat swap directory yang berguna sebagai memory cadangan untuk squid yaitu dengan cara squid –z
14
Catatan : Jika ada tulisan “2012/12/02 00:14:55 | Creating Swap Directories berarti kita bisa lanjut ke langkah selanjutnya
10. Jika berhasil seperti pesan yang ada diatas, maka langkah selanjutnya yaitu dengan perintah /etc/init.d/squid start untuk mengaktifkan lagi squid kita.
15
11. Berikutnya yaitu menambahkan script iptables di file rc.local untuk membelokkan situs yang kita tuju tersebut sehingga melewati proxy dulu yaitu dengan membuka file dengan perintah nano /etc/rc.local
16
26
17
12, Selanjutnya untuk mengaktifkan semua konfigurasi yaitu dengan merestart squidnya yaitu dengan perintah /etc/init.d/squid restart
Restarting Squid HTTP proxy: squid Waiting ……………… done
*harus ada kata “done” ketika merestart.
18
13. Buka Browser komputer Client dan buka situs-situs yang telah kita blok tadi, contoh : http://www.facebook.com . Anda akan melihat tampilan ini
19
14. Untuk melihat log squid ketika diaktifkan yaitu jika kita membuka situs-situs yang telah kita blokir maka di log tersebut akan tampil tulisan
20
27
15. Jika mau merubah tampilan pada saat di client yaitu dengan merubah text HTMLnya yaitu dengan cara nano /usr/share/squid/errors/English/ERR_ACCESS_DENIED
21

Jumat, 06 Februari 2015

Install Briker IPPBx

15.25 Posted by ROSYID'S BLOG No comments
Briker adalah IPPBX berbentuk software. “Dengan menginstall Briker pada komputer, maka komputer itu berubah jadi mesin PBX (private branch exchange) dengan kemampuan telekomunikasi via jaringan IP. Briker merupakan software IP PBX, bisa untuk VoIP server Semakin banyak Briker terpasang dan saling berhubungan melalui VoIP, semakin besar pula jaringan telekomunikasi berbasis IP gratis versi non-operator resmi.
1.      Pertama kali Install software “vmware” pada komputer anda.
2.      Selanjutnya barulah Install software “Briker” pada komputer anda.
Berikut ini cara install software briker di dalam vmware:
a.       Pertama buka vmware dan akan muncul tampilan berikut.

b.      Pilih menu New Virtual Machine pada tampilan home

c.       kemudian browser Briker dan klik next

d.      Selanjutnya pilih linux dan di version pilih other linux 2.6 kernel


e.       Ketik di virtual machine name ‘Briker’ dan next

f.        Proses Instalasi dilakukan dengan memilih no.1 Automatic (WARNING)

g.       Akan muncul tampilan berikut ini:


Dan login
Login : support
Password : Briker
Kemudian, kita dapat melihat IP BRIKER dengan comand “ifconfig”. IP BRIKER yang didapatkan 192.168.2.225 karena kita ingin mencoba untuk mengkoneksikan antara OS pada Vmware (Briker) dengan OS asli kita (OS saya windows 7) maka kita cek dulu apakah IP nya sudah dalam satu kelas. Logikanya jika berbeda kelas, maka dua jaringan tidak dapat saling berkoneksi dan dalam kasus ini, IP nya berbeda kelas, maka tantangan selanjutnya adalah bagaimana mengkoneksikan keduanya.

Default console login SSH (port 22) :
Login : support
Password : Briker
Web (HTTP port 80):
Username : administrator
Password : Briker
Untuk melihat IP : # ifconfig
Untuk masuk ke Root ,dengan perintah : # su –   dengan password Briker
Maka $ akan menjadi #.
Setelah itu ketik : # Setup


Pilih Network Confirguration kemudian tekan enter

Pada pilihan Device Confirguration tekan enter

Pada pilihan eth0   (eth0) - AMD   (PCnet32) langsung tekan enter

Pada gambar diatas silakan Centang/Ceklis Use DHCP dengan tekan Space lalu Ok

Pilih save.

Pilih Save & Quit.

Kemudian pilih Quit.

Jika failed itu berate network anda belum enable ,coba klik kanan icon network lalu lihat,,kalau sudah connect maka Cuma ada pilihan disconnect dan settings dan sebaliknya.seperti gambar dibawah ini:

Pada settings network, Ceklis Bridged, normal adalah NAT. lalu klik ok.

Setelah itu Restart Network :#  /etc/init.d/network restart

Lalu buka browser buka sesuai dengan IP anda, Ip saya 172.16.30.32 :

Lalu isikan sebagai berikut :
Username : administrator
Password : Briker
Muncul tampilan briker setelah Login.

Pilih atau klik IPPBX Administration

Pada tab setup klik Extensions

Pilih Generic SIP Device lalu Submit

 Kemudian Isi data sebagai berikut,
Bagian Add Extension
·         User Extension            : 162
·         Display Name              : Direktur1
Bagian Extension Options
·         Rising Time : 10 detik berguna untuk menunggu pangillan
Bagian Device Options
·         Account code   : 162
·         Secret              : 162
Bagian Voicemail dan Directory
·         Email Attachment       : Pilih YES
·         Email Address             : oktavianizen@yahoo.co.id
·         Voicemail Password     : 162
Kemudian klik Submit.
Kemudian  Coba di Echotest dengan melakukan panggilan *43
Pemanggilan exstension yang lain dari 163 ke 162 seperti gambar di bawah ini: 

Exstension 163 akan memanggil ke exstension 162 sama dengan Direktur1.

Terhubung ke exstension lain